Showing posts with label vegetarian. Show all posts

5.30.2009

Asparagus Chickpea Brown Rice


This might be the most nutritious and healthy dish I've made thus far. I just couldn't resist when I saw the recipe. I love asparagus, chickpeas and tahini, so why not all together all at once.

Aside from the minor prep work needed before you get started, this is a pretty quick little side. Jeff and I both loved it, and it made for pretty good lunch leftovers the next day. The trick with this dish is to season just right with salt and to add in a little more dressing while eating.

Asparagus Chickpea Brown Rice
From 101 Cookbooks

3 tablespoons extra-virgin olive oil
1 14-ounce can of chickpeas, drained and rinsed
2 cloves garlic, minced
1 medium yellow onion, diced
1 bunch asparagus, cut into 1-inch segments
2-3 cups pre-cooked brown rice
1 cup almond slivers, toasted
kosher salt

Tahini Dressing:

1 garlic clove, smashed and chopped
1/4 cup tahini
zest of one lemon
scant 1/4 cup freshly squeezed lemon juice
2 tablespoons extra-virgin olive oil
2 tablespoons hot water
scant 1/2 teaspoon kosher salt

Prepare rice according to package directions

Make the dressing by whisking together the garlic, tahini, lemon zest and juice, and olive oil. Add the hot water to thin a bit and then the salt. Set aside.

Add olive oil to a big skillet over medium-high heat. Swirl the oil around to coat the pan, then add the chickpeas and sprinkling of salt. Let the beans saute for a couple minutes. Add the garlic and onions. Stir for a minute. Stir in the asparagus with another pinch or two of salt, cover with a lid for a minute or two to steam - just until the asparagus brightens and softens up just a bit. Uncover and stir in the rice and almond slivers. Taste and add more salt if needed. Serve in a big bowl drizzled with a few tablespoons of the tahini dressing. Serve remaining dressing on the side and let each person add more dressing to their tastes.

Serves 4-6.


4.15.2009

Hummus for my Hubby


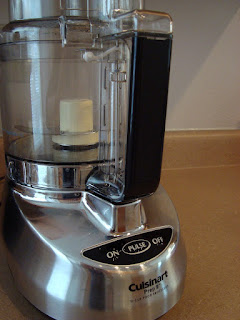
Hello Gorgeous! Please don't be jealous. Please don't think I'm spoiled. I patiently waited for the right time to ask for a food processor for years. Other needs always trumped the want for this luxurious appliance. However, this birthday, I didn't need maternity clothes or work clothes or any other personal effect, so my wonderful parents bestowed upon me this beautiful, majestic machine. I've been worshiping it now for a little over a week. I've made mostly just delicious meals for Marlo that she's actually eating (hooray for me). However, yesterday, I was determined to make something new and different that I've never made before. I flipped through the Cuisinart owner's manual and found this recipe for hummus. Jeff loves hummus. I couldn't really care less about it, but selflessly, I thought I'd give it a shot and surprise him with his favorite... dip, spread, condiment - whatever it is. I'm not a hummus aficionado, but it tasted good to me.


Hummus

1/4 cup fresh flat leaf parsley
2 strips lemon zest, 1/2 X 2 inches, bitter white scraped off
1/2 tsp. kosher salt
2 small garlic cloves
2 (15.5 oz.) cans chickpeas or garbanzo beans, drained, rinsed and drained again
3 Tbsp. tahini paste
2 Tbsp. fresh lemon juice
5 Tbsp. water
1 1/2 tsp. ground cumin
1 1/2 Tbsp. extra virgin olive oil

Using metal blade, pulse to chop parsley 10-15 times in food processor. Remove parsley and reserve. Add zest and salt to work bowl and pulse 10 times. With the machine running, add garlic through the feed tube, and process 10 seconds. Add the drained chickpeas, tahini, lemon juice, water and cumin to the work bowl, process 1 minute to combine. Scrape down the sides and bottom of the work bowl. Turn the machine on again, and add olive oil through the feed tube in a slow steady stream, and process until hummus is smooth and creamy, about 3 minutes. Add half the chopped parsley; pulse 10-15 times to incorporate. Allow hummus to set for 30 minutes before serving to allow the flavors to incorporate. Sprinkle with remaining parsley and serve in shallow serving bowl with pita slices and raw vegetables.


For lunch, using my favorite new appliance, I shredded some vegetables (carrots, cucumbers and red pepper) I had left in the fridge to make a vegetable and hummus pita. It was delicious, but it could have used more hummus..Yummmm.

3.18.2009

Grilled Portobello Mushroom & Roasted Red Pepper Sandwich


If it's warm enough to walk outside without shoes or a jacket, I'm grilling dinner. There's nothing better in my opinion than food cooked over a flame. It tastes better and there are no pans to wash afterwards. When we lived in Chicago we were deeply deprived of any private outdoor space in which we could keep a grill. But I made due inside. I had a nice little Cuisinart indoor grill and gas burners, and I used them to their full extent. One thing I absolutely love to cook with is roasted red peppers. In Chicago, I could make them year round by just sitting the little peppers on the gas flame burner to blacken the skin. But here in Indiana, world of the electric range, I've had to retire all my roasted red pepper recipes for the season. I know that you can blacken peppers in the broiler in the oven. I just don't think they turn out as well so I never do it.

So the beautiful night last night got me all excited to cook up something on the grill. I've made these sandwiches twice last summer and really enjoyed them, so I thought it would be a nice change up from all the chicken and pork we've been eating. I started roasting the red pepper on the grill only to discover that my grill ran out of gas about 80% of the way through. Great. I had these beautiful mushrooms marinating and all my other high quality ingredients ready to make these sandwiches and no fire. (**This was just one way my night turned to hell last night. I also knocked over a full Brita pitcher in the fridge and spilled Jeff's beer all over the counter top. Yeah it was a good night. No, I'm not pregnant.)

So, I pulled out my trusty indoor grill, fired it up and made due. The end result was tasty but not as good as I recall it being the last 2 times. I blame this on a not-roasted-enough red pepper and somewhat flavorless mushrooms that would've grilled up beautifully if the Blue Rhino tank would've lasted just one more night. Oh well, trust me, if your grill doesn't betray you half way through, they'll taste great.

And if you've never had portobello mushrooms, you should really try them. Back when I was a loser and wouldn't eat mushrooms, my life was pretty boring. I credit Jeff for opening up my small town Ohio palate. Portobellos have really great flavor and a very nice texture. If my grocery store has them, your grocery store has them.

Grilled Portobello Mushroom & Roasted Red Pepper Sandwich

Preparing the Mushrooms

Buy two portobello mushrooms that do not show any signs of spoiling (no mushy, slimy spots) and have nice, undamaged gills (the produce lady at Meijer taught me this). Remove the stems - they should just pull off. You aren't supposed to rinse your mushrooms under water. Instead take a damp cloth/paper towel and wipe the caps down. Now I have a hard time with the "unknown" of what may be lurking in the dark depths of the underside's gills, so I give the gills quick rinse and dry - so shoot me. I've seen some portobellos prepared with the gills removed. You could do this as well, they are a little weird.

Marinade (adapted from Food Network):

1/3 cup olive oil
2 Tbsp. unsalted butter, melted
1/4 tsp. red pepper flakes
2 tsp. minced garlic
1/4 cup white wine
1 tsp. lemon zest

Place mushrooms gill sides up in a shallow baking dish. Combine all ingredients in a bowl and whisk to combine. Pour over the mushrooms and let sit at room temperature for 20 minutes, turning once.

While the mushrooms are marinating, roast the red peppers. Place the peppers over high flame turning as each side blackens. Once pepper is completely blackened, remove from grill and immediately place in a bowl and cover tightly with plastic wrap. Steam for 15-20 minutes. Remove from bowl (careful, it's probably really hot!) and strip away the charred outer layer of skin and remove the stem and seeds. Cut into 2 pieces. Set aside.

Pat mushrooms dry and place gill sides up on grill over a medium/medium-low flame. Grill slowly for about 20 minutes. Flip and grill for 5-10 more minutes.

Assembling the Sandwiches

2 hamburger buns
4-6 large basil leaves
fresh mozzarella
roasted red pepper
2 grilled portobellos

Place the grilled mushroom on the bun. Top first with half the roasted red pepper, then with two 1/4 inch slices of fresh mozzarella and finally with basil. I like my sandwiches dry, but I think adding mayo or pesto to the bun would be nice for all you condiment lovers out there.